Recreating Apple Mail's search using SwiftUI
Learn how to build complext search UI using swiftUI.
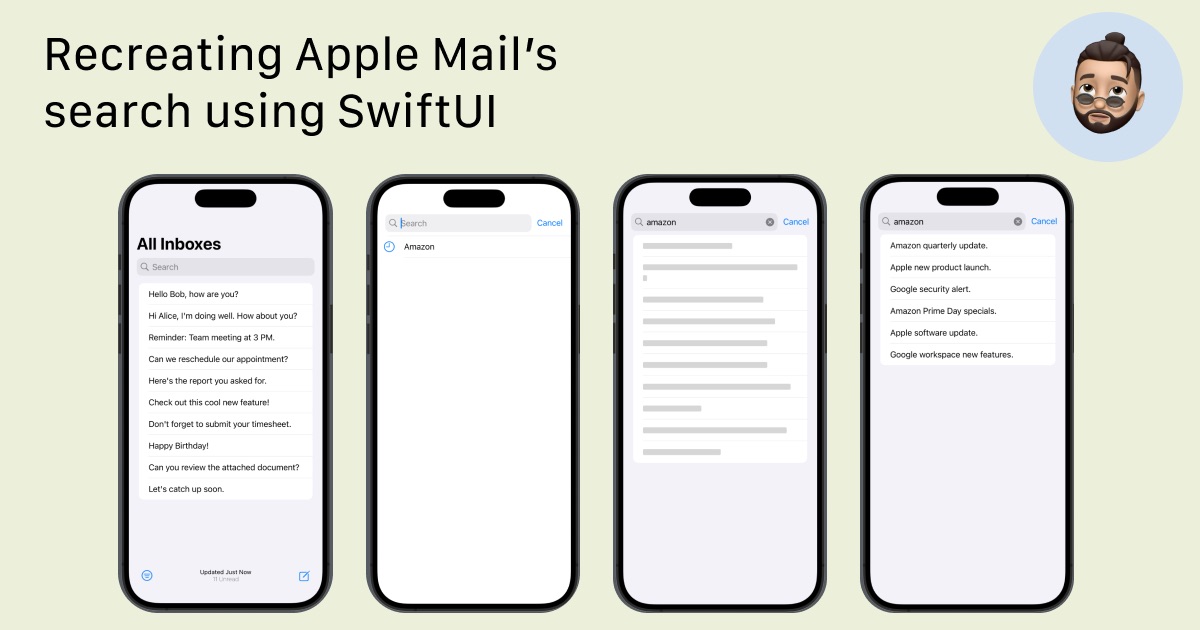
In today’s article we’ll recreate Apple Mail Search using just SwiftUI and no private APIs. Also it will allow to perform real search, not just filtering the list. We’ll use things such as .searchable, isSearching. Our solution will allow to perform search, display previous search queries, display search results.
Final result
Without further ado let’s get to the point.
Data models
Let’s start with declaring model data for our tutorial
1
2
3
4
5
struct Email: Identifiable {
    let id: UUID = UUID()
    let from: String
    let message: String
}
Now let’s create mockdata for simulating fetching emails:
1
2
3
4
5
6
7
8
9
10
11
12
13
14
extension Email {
    static let fetchedEmails: [Email] = [
        Email(from: "[email protected]", message: "Hello Bob, how are you?"),
        Email(from: "[email protected]", message: "Hi Alice, I'm doing well. How about you?"),
        Email(from: "[email protected]", message: "Reminder: Team meeting at 3 PM."),
        Email(from: "[email protected]", message: "Can we reschedule our appointment?"),
        Email(from: "[email protected]", message: "Here's the report you asked for."),
        Email(from: "[email protected]", message: "Check out this cool new feature!"),
        Email(from: "[email protected]", message: "Don't forget to submit your timesheet."),
        Email(from: "[email protected]", message: "Happy Birthday!"),
        Email(from: "[email protected]", message: "Can you review the attached document?"),
        Email(from: "[email protected]", message: "Let's catch up soon.")
    ]
}
and for simulating search results.
1
2
3
4
5
6
7
8
9
10
extension Email {
    static let searchResults: [Email] = [
        Email(from: "[email protected]", message: "Amazon quarterly update."),
        Email(from: "[email protected]", message: "Apple new product launch."),
        Email(from: "[email protected]", message: "Google security alert."),
        Email(from: "[email protected]", message: "Amazon Prime Day specials."),
        Email(from: "[email protected]", message: "Apple software update."),
        Email(from: "[email protected]", message: "Google workspace new features.")
    ]
}
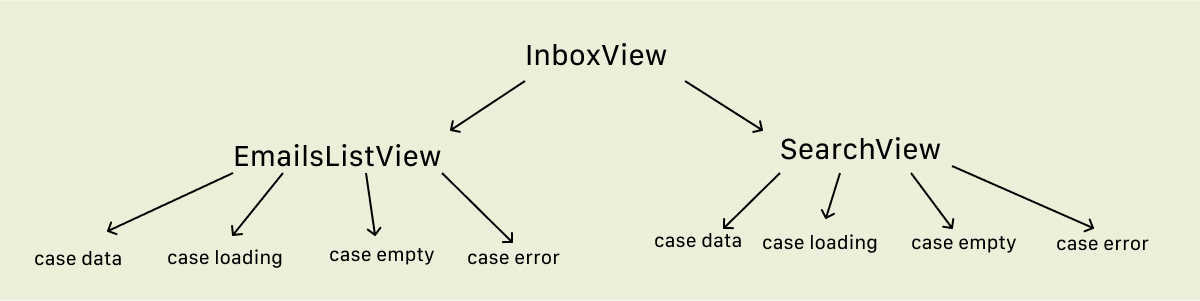
State Enums
For our example we’ll need to track states for 3 views. Of course the best way to represent states are enums. Here’s the visual representation of connection between different states:
Now Let’s create them!
1
2
3
4
5
6
7
8
9
10
11
12
13
14
15
16
17
18
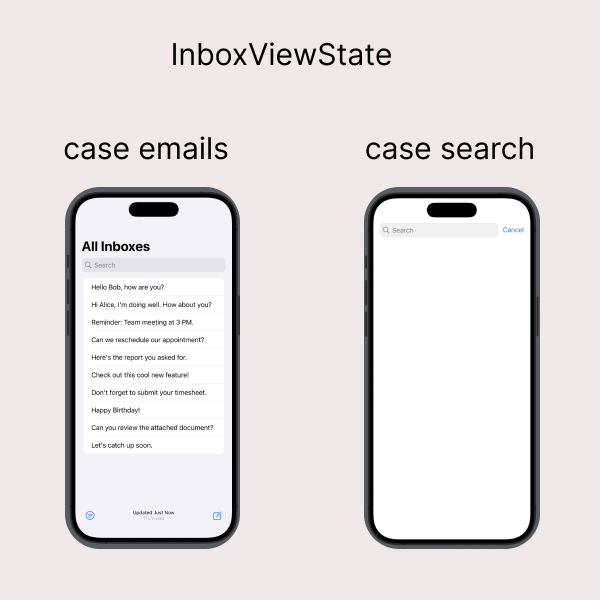
enum InboxViewState {
case emails
case search
}
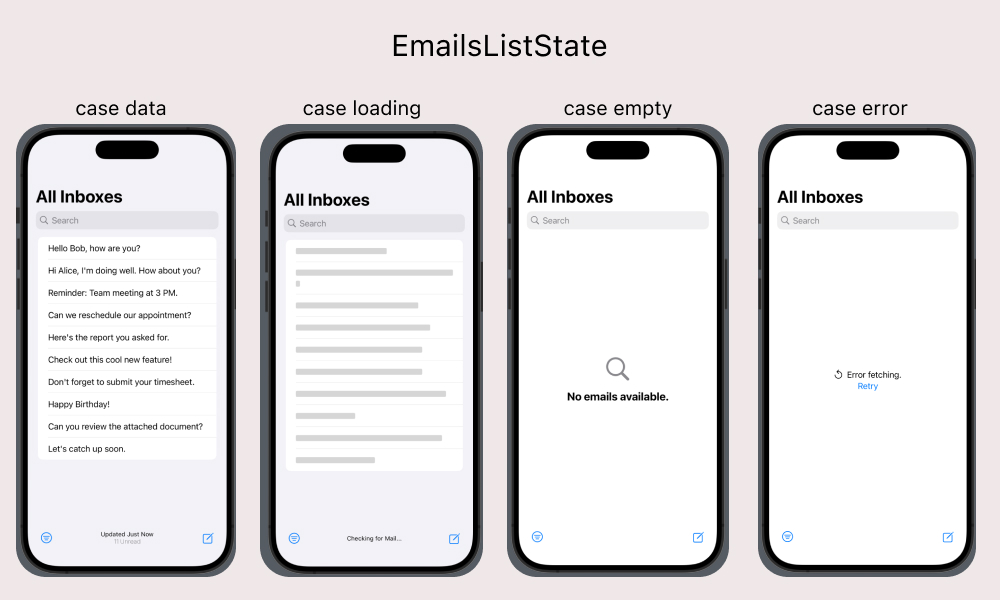
enum EmailsListState {
case data
case loading
case empty
case error
}
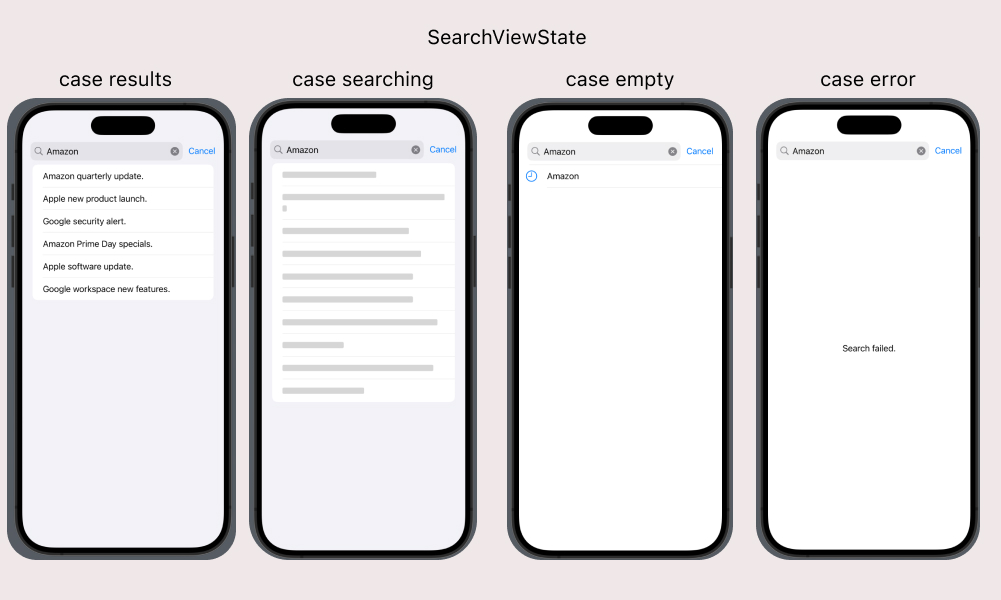
enum SearchViewState {
case results
case searching
case empty
case error
}
ViewModel
Let’s create protocol for our viewModel
1
2
3
4
5
6
7
8
9
10
11
12
13
14
15
protocol InboxViewModel: ObservableObject {
    var emails: [Email] { get }
    var searchResults: [Email] { get }
    var searchQueries: [String] { get }
    var searchText: String { get set }

    //Our states will be managed only within the viewModel, so let's keep them private(set)
    var inboxViewState: InboxViewState { get }
    var emailsListState: EmailsListState { get }
    var searchState: SearchViewState { get }

    func fetchNews() async
    func performSearch() async
    func observeSearchMode(newValue: Bool)
}
and our viewModel
1
2
3
4
5
6
7
8
9
10
11
12
13
14
15
16
17
18
19
20
21
22
23
24
25
26
27
28
29
30
31
32
33
34
35
36
37
38
39
40
41
42
43
44
45
46
47
48
49
50
51
52
53
54
55
56
final class UIInboxViewModel: InboxViewModel {
    @Published var searchText: String = ""
    @Published private(set) var emailsListState: EmailsListState = .data
    @Published private(set) var inboxViewState: InboxViewState = .emails
    @Published private(set) var searchState: SearchViewState = .empty

    @Published var emails: [Email] = []
    @Published var searchResults: [Email] = []
    @Published var searchQueries: [String] = []

    @MainActor
    func fetchNews() async {
        //Setting viewState to loading
        emailsListState = .loading

        //Simulating fetching operation
        try! await Task.sleep(for: .seconds(1))

        //Returning fetched emails
        emails = Email.fetchedEmails

        //Setting viewState
        emailsListState = !emails.isEmpty ? .data : .empty
    }

    @MainActor
    func performSearch() async {
        do {
            self.searchState = .searching

            //Simulating fetching operation
            try await Task.sleep(for: .seconds(1))

            //Appending search results
            self.searchQueries.append(searchText)

            //Returning search results
            self.searchResults = Email.searchResults

            //Changing searchView state depending on searchResults
            self.searchState = !searchResults.isEmpty ? .error : .empty
        } catch let error {
            self.searchState = .error
        }
    }

    //Observing isSearching value change and switching between InboxView states.
    func observeSearchMode(newValue: Bool) {
        if newValue {
            inboxViewState = .search
        } else {
            inboxViewState = .emails
            searchState = .empty
        }
    }
}
UI - RootView
Now let’s create our main container InboxView
We’ve to use environment value isSearching and .searchable viewModifier in a separate views. If we keep them in the same view - we won’t see any changes of environment value.
Also notice that our views depend on protocol rather than concrete class implementation. It allows us easily pass the mock data to have fully functional previews and write UI tests later on.
1
2
3
4
5
6
7
8
9
10
11
12
13
14
15
16
17
18
19
20
21
22
struct RootView<ViewModel: InboxViewModel>: View {
    @StateObject var viewModel: ViewModel

    var body: some View {
        NavigationStack {
            InboxView(viewModel: viewModel)
                .navigationTitle("All Inboxes")
                .searchable(text: $viewModel.searchText)
                .task {
                    await viewModel.fetchNews()
                }
                .refreshable {
                    await viewModel.fetchNews()
                }
                .onSubmit(of: .search) {
                    Task {
                        await viewModel.performSearch()
                    }
                }
        }
    }
}
UI - SubView
Proceeding with creating InboxView
1
2
3
4
5
6
7
8
9
10
11
12
13
14
15
16
17
18
19
20
21
22
23
24
struct InboxView<ViewModel: InboxViewModel>: View {
    @Environment(\.isSearching) private var isSearching
    @ObservedObject var viewModel: ViewModel

    var body: some View {
        Group {
            switch viewModel.inboxViewState {
            case .emails:
                EmailsListView(viewModel: viewModel)
            case .search:
                SearchView(viewModel: viewModel)
            }
        }
        .onChange(of: isSearching) { oldValue, newValue in
            viewModel.observeSearchMode(newValue: newValue)
        }
        .animation(.bouncy, value: viewModel.emailsListState)
        .animation(.linear, value: viewModel.searchState)
        .toolbar {
            inboxViewToolbar
        }
        .toolbar(viewModel.inboxViewState == .search ? .hidden : .visible, for: .bottomBar)
    }
}
And here goes our toolbar:
1
2
3
4
5
6
7
8
9
10
11
12
13
14
15
16
17
18
19
20
21
22
23
24
25
26
27
28
29
30
31
32
33
34
35
36
37
38
39
40
41
42
43
44
45
46
47
48
49
extension InboxView {
    @ToolbarContentBuilder
    var inboxViewToolbar: some ToolbarContent {
        ToolbarItem(placement: .bottomBar) {
            Button { } label: {
                Image(systemName:"line.3.horizontal.decrease.circle")
            }
        }
        ToolbarItem(placement: .bottomBar) {
            Spacer()
        }
        Group {
            switch viewModel.emailsListState {
            case .data:
                ToolbarItem(placement: .bottomBar) {
                    VStack {
                        Text("Updated Just Now")
                            .font(.caption)
                        Text("11 Unread")
                            .font(.system(size: 12, weight: .ultraLight, design: .default))
                    }
                }
            case .loading:
                ToolbarItem(placement: .bottomBar) {
                    VStack {
                        Text("Checking for Mail...")
                            .font(.caption)
                    }
                }
            case .empty:
                ToolbarItem(placement: .bottomBar) {
                    EmptyView()
                }
            case .error:
                ToolbarItem(placement: .bottomBar) {
                    EmptyView()
                }
            }
        }
        ToolbarItem(placement: .bottomBar) {
            Spacer()
        }
        ToolbarItem(placement: .bottomBar) {
            Button { } label: {
                Image(systemName:"square.and.pencil")
            }
        }
    }
}
UI - EmailsListView
1
2
3
4
5
6
7
8
9
10
11
12
13
14
15
16
17
18
19
20
21
22
23
24
25
26
27
28
29
30
31
32
33
34
35
36
37
38
39
40
struct EmailsListView<ViewModel: InboxViewModel>: View {
    @ObservedObject var viewModel: ViewModel
    var body: some View {
        Group {
            switch viewModel.emailsListState {
            case .data:
                emailsList
            case .loading:
                LoaderView()
                    .redacted(reason: .placeholder)
            case .empty:
                ContentUnavailableView("No emails available.", systemImage: "magnifyingglass")
            case .error:
                errorStateView
            }
        }
    }

    private var emailsList: some View {
        List {
            ForEach(viewModel.emails) { email in
                Text(email.message)

            }
        }
    }

    private var errorStateView: some View {
        VStack {
            Label("Error fetching.", systemImage: "arrow.counterclockwise")
            Button {
                Task {
                    await viewModel.fetchNews()
                }
            } label: {
                Text("Retry")
            }
        }
    }
}
UI - SearchView
1
2
3
4
5
6
7
8
9
10
11
12
13
14
15
16
17
18
19
20
21
22
23
24
25
26
27
28
29
30
31
32
33
34
35
36
37
38
struct SearchView<ViewModel: InboxViewModel>: View {
    @ObservedObject var viewModel: ViewModel
    var body: some View {
        Group {
            switch viewModel.searchState {
            case .results:
                searchResultsView
            case .searching:
                LoaderView()
                    .redacted(reason: .placeholder)
            case .empty:
                searchQueriesHistoryView
            case .error:
                Text("Search failed.")
            }
        }
    }
    private var searchResultsView: some View {
        List {
            ForEach(viewModel.searchResults) { searchResult in
                Text(searchResult.message)
            }
        }
    }

    private var searchQueriesHistoryView: some View {
        List {
            ForEach(viewModel.searchQueries, id:\.self) { searchQuery in
                Label("\(searchQuery)", systemImage: "clock")
                    .padding(.horizontal, 10)
                    .frame(maxWidth: .infinity, alignment: .leading)
                    .listRowInsets(EdgeInsets())
                    .padding(.vertical, 5)
            }
        }
        .listStyle(.plain)
    }
}
UI - LoaderView
I prefer using redacted view placeholder instead of ProgressView() or any other custom loaders, when working with a content apps. We’ll use mock data created eaerlier in our extensions for Email object - fetchedEmails
1
2
3
4
5
6
7
8
9
struct LoaderView: View {
    var body: some View {
        List {
            ForEach(Email.fetchedEmails) { email in
                Text(email.message)
            }
        }
    }
}
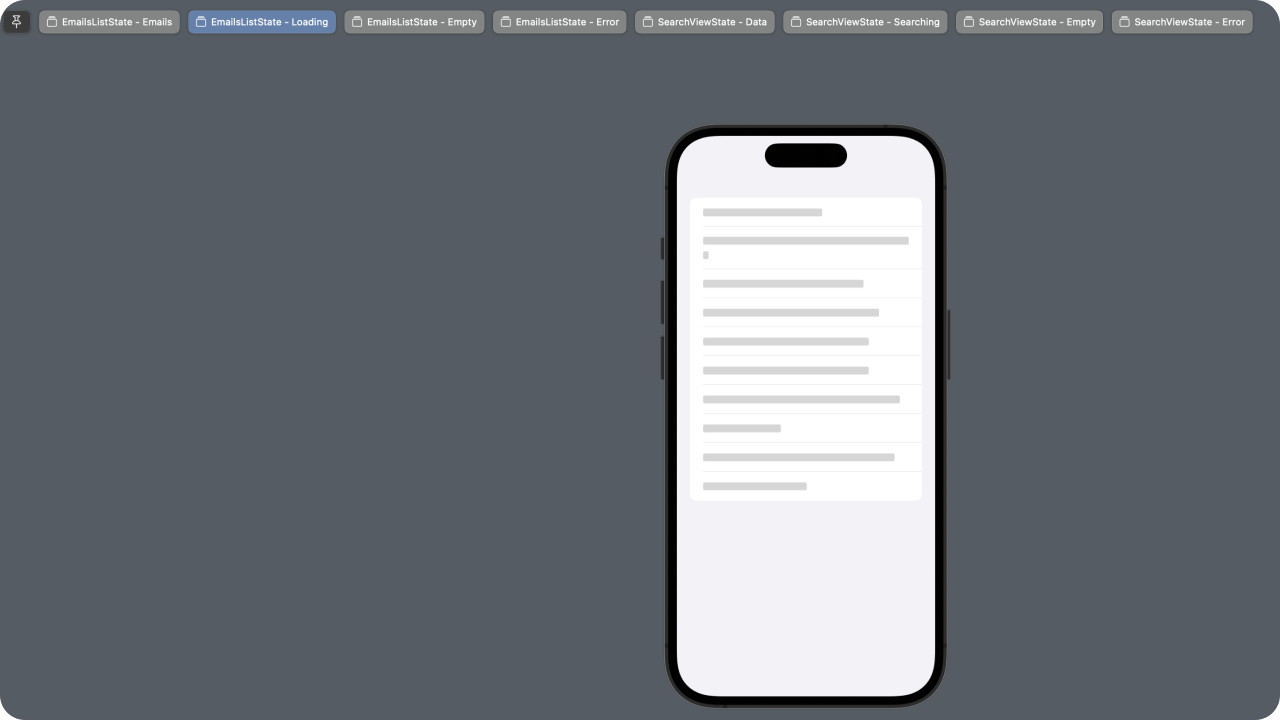
TestViewModel - Make Previews Works
We can now create a test viewModel with a custom initiliazer, which allow us to iterate through the states in our previews.
1
2
3
4
5
6
7
8
9
10
11
12
13
14
15
16
17
18
19
20
21
22
23
24
25
26
27
28
29
30
31
32
33
34
35
36
37
38
39
40
41
42
43
44
45
46
47
48
final class TestInboxViewModel: InboxViewModel {
    @Published var searchText: String = ""
    @Published private(set) var emailsListState: EmailsListState
    @Published private(set) var inboxViewState: InboxViewState
    @Published private(set) var searchState: SearchViewState

    @Published var emails: [Email] = []
    @Published var searchResults: [Email] = []
    @Published var searchQueries: [String] = []

    init(emailsListState: EmailsListState = .data,
         inboxViewState: InboxViewState = .emails,
         searchState: SearchViewState = .empty) {
        self.emailsListState = emailsListState
        self.inboxViewState = inboxViewState
        self.searchState = searchState

        switch emailsListState {
        case .data:
            self.emails = Email.fetchedEmails
        case .empty, .loading, .error:
            self.emails = []
        }

        switch searchState {
        case .results:
            self.searchResults = Email.searchResults
        case .empty, .searching, .error:
            self.searchResults = []
        }
    }


    @MainActor
    func fetchNews() async {}

    @MainActor
    func performSearch() async {}

    func observeSearchMode(newValue: Bool) {
        if newValue {
            inboxViewState = .search
        } else {
            inboxViewState = .emails
            searchState = .empty
        }
    }
}
Also let’s create two extensions for our states to handle names of our previews:
1
2
3
4
5
6
7
8
9
10
11
12
13
14
extension EmailsListState {
    var displayName: String {
        switch self {
        case .data:
            "EmailsListState - Emails"
        case .loading:
            "EmailsListState - Loading"
        case .empty:
            "EmailsListState - Empty"
        case .error:
            "EmailsListState - Error"
        }
    }
}
1
2
3
4
5
6
7
8
9
10
11
12
13
14
extension SearchViewState {
    var displayName: String {
        switch self {
        case .results:
            "SearchViewState - Data"
        case .searching:
            "SearchViewState - Searching"
        case .empty:
            "SearchViewState - Empty"
        case .error:
            "SearchViewState - Error"
        }
    }
}
Final - Previews
1
2
3
4
5
6
7
8
9
// Preview for EmailsListView
struct EmailsListView_Previews: PreviewProvider {
    static var previews: some View {
        ForEach(EmailsListState.allCases, id: \.self) { state in
            EmailsListView(viewModel: TestInboxViewModel(emailsListState: state))
                .previewDisplayName(state.displayName)
        }
    }
}
1
2
3
4
5
6
7
8
9
10
// Preview for SearchView
struct SearchView_Previews: PreviewProvider {
    static var previews: some View {
        ForEach(SearchViewState.allCases, id: \.self) { state in
            SearchView(viewModel: TestInboxViewModel(searchState: state))
                .previewDisplayName(state.displayName)
        }
    }
}
Now we can see all out states and it’s just much easier to work on UI without a need to perform data fetches.
Summary
In this tutorial, I’ve shown you how to recreate Apple Mail's search functionality using pure SwiftUI. We’ve built a complex yet flexible search UI that performs real searches and manages multiple view states. By leveraging SwiftUI's latest features and following best practices in state management and architecture, we’ve created a solution that’s both powerful, maintainable and scalable. I hope this guide helps you implement sophisticated search interfaces in your own iOS apps, demonstrating that with SwiftUI, we can achieve native-like experiences without resorting to private APIs.
Full code: Github